Thursday, February 28, 2013

Cycling Club Sponsorship


A cycling club can satisfactorily sustain itself via membership dues and benevolent, personal
contributions.  However, if a club wishes to take it to the next level, and they should, seeking outside sponsorship is a quid pro quo no-brainer.  Hey, it ranges from discounts, to free stuff, and the flip-side is the shop receives free publicity via the club, plus the increased business through the partnership.  Both parties benefit, and let’s face it – Interaction should be the nucleus of cycling, anyway.

How to go about seeking sponsorship should begin with the organization’s willingness to do so.  Basically, make sure everyone is on the same page, the goals are clear and concise, and the sponsor has assurance to receive some return on their investment.  Remember, this is a relationship.  The shop sponsors the club, and the club supports the shop.  Seems simple, right?  Well, in theory, yes.  In reality, it takes a little work to succeed.

The formula, however, is not really all that hard to realize if done correctly.  In the exchange for club support, the shop gets advertised by the club in various ways, from a logo on the club kit, to mention on the clubs website or blog, to word of mouth.  The shop, in turn, also displays the club’s name on the store front, in the store via a printed club newsletter, the shop website, and even the clubs kit for purchase in-store.  And this is just for starters.  The creativity exchange is almost limitless.

The usual discount for a club from a shop is 10%.  They can give 10% to their grandmother all day, so strive for 20% to 25%.  Remember, since this is a business relationship, ask for more than is given to everyday customers.  The converse, however, is the shop has a right to expect more from the club then everyday customers, too.  In the internet age, brick and mortars have tough competition for your cycling dollars.  Reward the shop with your business.  Be there for them, and they will be there for you.

Once the relationship is established, it is free to grow, provided it is nurtured, and periodically evaluated for good health.  Kept fit, the relationship can grow to levels beyond imagination.  Remember, it is worth the effort, and do not let the partnership fail for any reason.  And, most of all – Keep a line of communication open at all times.  By being accessible to each other, the flow of information can assist both parties in getting the most out of the partnership.

So far, so good, right?  Well, now for a word of caution.

I once put together a sponsorship package for an established club with an up-and-coming shop, and that relationship was set to be a long-term, transcendental affair, with discounts in excess of 40% off retail.  Save for one small detail.  Even with an initial outlay of $2000.00 USD in free, yes free, tools, saddles, stems, bars, tires and nutrition, the stick in the mud was the club’s then president whom just flat out said “No!”  His reasoning?  Well, he claimed if one shop agreed to sponsor the club, then we should have many shops involved so as not to show favoritism.

Did you get that?  Did you understand it?  Good, because I didn’t understand it, either.

In the end, the club lost my enthusiasm and support, the shop decided to nix the sponsorship deal PERMANENTLY, thus the club, and its membership, lost out on a good, reliable source of parts, clothing, nutrition and free advertising.  All the shop wanted in return for the sponsorship was some publicity and a growth in business from that publicity.  There were no threats of broken legs, no blood oath of loyalty, or cement overshoes if the club failed to support the shop. 

Epic fail?  Oh, yeah. 

On another occasion I was talking to the owner of another shop, which happens to be named after the same city a well-established club is named after, and that owner claimed he has never, get this, NEVER, been approached by anyone in that club, let alone any club, regarding a sponsor relationship.  And he was indeed willing to do so, if asked.  This situation was a classic example of an opportunity looking for a partner.

Bottom line, if you seek to go after sponsorship for your club, and again, you definitely should, make sure everyone has the clubs’ and shops best interests at heart, as bad relationships in the small community known as cycling are very hard to repair.  Remember, this is a long-term commitment.  In an age of insincerity, and contracts not being worth the paper they are printed on, it is high-time to return to honest, personal, long-term relationships.

In the words of Mr. Miyagi in the original Karate Kid movie – “First, make sacred pact.” 

Yes, it is like that. 

Tuesday, February 26, 2013

Bike Path Fail – The Pacific Electric Trail


The western end of the trail begins in Claremont.  Asphalt is the material of choice here.

I’ll preface this article by stating I wrote this installment of “Surface Fail’ with not too keen a sense of satisfaction.  See, I had high hopes for a bike trail that is one of the most accessible in the Los Angeles Basin.  The problem seems to be the trail is funded by each respective city it traverses instead of being completed uniformly by one agency.  It was put together piece-meal, and it shows.

Formally the Right-of-Way of the famous Pacific Electric Railway “Red Cars,” the Pacific Electric Trail is one of the newer, dynamic bicycle trails to open here in Southern California.  After the passing of the Red Cars, the Southern Pacific Rail Road took over the line until suffering its own demise.  The land lay dormant for some time, until it was decided a bike trail though each city would be a wise use of said land.  I agree.  However, a good idea and good execution are two distinctly different animals.

Rancho Cucamonga - Beautiful concrete here.  Expansion relief channels are like speed bumps.

While we are all grateful for the nice, new surface, we are all left wondering why portions were done in concrete and not asphalt.  While it is true that concrete wins in the durability department, the downside is it requires stress relief channels to avoid cracking.  See, with these stress relief channels every ten feet or so, it feels like little speed bumps while riding over them.  It makes for one heck of an uncomfortable ride, and it quickly becomes so annoying you want to get off the trail, all together.

Another problem is the extremely high number of street crossings the trail makes.  The issue is so bad in the City of Upland, that it is best to get off the trail and take side streets to actually be able to ride your bike.  See, when a portion of the Upland trail has Stop Signs almost every one hundred feet (100), we have a problem. 

Additionally, the crossing at Euclid Avenue may as well be a life-and-death crap-shoot.  You truly do take your life in your own hands crossing there, as there is no clearly designated bicycle crossing, and there is not a signal to halt the fast moving traffic on the six-lane (6) highway to make anything remotely resembling a safe crossing.

One of the numerous crosswalk buttons placed ridiculously far from the trail.

One of the numerous, and dangerous, major street crossing one must brave to ride the trail.

Oddly, the oldest portions of the trail are the smoothest for cycling.

Most other street crossings on the trail have a push button to change the provided traffic signal.  However, the buttons are either so far off the trail you have to dismount and walk over to them, or when you do manage to find, and push, a button next to the path, the change of signal time can be an eternity.  Because of the latter scenario, I have witnessed most cyclists (and pedestrians) flat-out dangerously jay-walk.

And a quick note on those pedestrians.  The trail planners were wise enough to provide dirt trails along the bike path for walkers, runners, and Fat Tire riders.  However, that does not stop walkers, and the dreaded runners from clogging the bike path, refusing to yield the right of way.  The runners are especially guilty, as for some unknown reason to the rational world, they see fit to run opposite traffic and think they are somehow doing cyclists a favor by forcing us to swerve for these creatures.

So, all-in-all, while it is a nice trail that meanders through many of our beautiful foothill communities, for serious cyclists, it is best avoided and left to the recreational users.

And, that bums me out.

Thursday, February 21, 2013

Fizik R3 Road Shoe Review


Fresh Out Of The Box, And Ready For Action.  They Also Come In Red Or Black.

In a previous article on choosing the correct road shoe (“Cycling Shoes – Is Spending More Really Better?” Cycling Dynamics,11-12-2012), I wrote the most important aspect one should shop for was the stiffest carbon sole they could afford.  Well, with the Fizik line of shoes, the rule of a stiff carbon sole definitely holds true.

I have been using the R3’s for about three weeks now, and while that does not constitute a long-term test, the immediate feedback from my rides is quite clear – These are the best darn shoes I have ever tried.  That is quite a tall statement, however, once you try these shoes, I firmly believe you will agree.  Fizik hand makes them in Italy, and they are designed to invoke the look (and feel) of a fine, high-end Italian shoe.  They succeeded.

Perforations For Cooling, Black Portions Of Kangaroo Skin, And Sleek Italian Lines Mark The R3

The material has been described in some reviews as cow and Kangaroo hide (the R1’s are).  In reality, the main uppers are made of Fizik’s own Microtex material, and the toe and heel areas are made of Kangaroo hide.  In plain language – Both are very tough and durable materials.  There are two Velcro straps made out of very stylish (and durable) sail-cloth, with cool looking Zinc tips.  While the R1 shoe gets a carbon buckle, the R3 gets the Zinc treatment on its buckle, and that is OK with me.  Though I am not too big on ratcheting buckles, the Fizik version is a whole lot easier to use and adjust than Sidi buckles I have encountered.  As for the sail cloth straps, they are very light weight, and are extremely easy to use.  Ventilation is handled by perforation in the tops and insides of the shoes, however, I will have to wait until summer to test the cooling capacity of the R3’s.  The sculpted sole has to be seen, and tried on the bike, to believe.  Until you have tried a durable carbon sole, you have not felt what it is like to experience pure power going straight through the pedals.  As the sole is sculpted towards the heel, it curves into what Fizik calls the “Mobius Rail.”  I don’t know what that is, but it sure seems to work, as I felt no detectable heel lift, even when hammering out of the saddle.  Fizik was also intelligent enough to put some of the smoothest, easily replaceable rubber pads on the sole to aid in walking, and they eliminate a lot of the “Clickity-Clack” you get from walking in cycling shoes.

A Well Marked Sole Makes Cleat Placement A No-Brainer

The Mobius Rail, Sculpted Heel, And Replaceable, Rubber Heel Pad.

Beautiful, Graceful Lines And Subtle Graphics.

And now for something completely different.  For reasons unfathomable to this mild-mannered evaluator, the entire Fizik shoe line has been revamped for 2013.  While the sail cloth, buckle and excellent carbon sole remain, the uppers are now nylon and Kangaroo skin, and the built-in arch supports are supposedly lower.  This was apparently done in response to people claiming fit issues and size discrepancies.  I myself was told to try a size 47, though my usual size is a 48.  The rule of thumb, reviews claimed, was Fizik’s run large.  Well, they do not.  The Fizik size 48 fit me perfectly, and anything smaller just would not have worked.

So, what does this all add up to?  Well, in my opinion, I would get hold of the 2012 R3’s ASAP before they disappear.  Yes, they are that good, and with the release of the 2013 model line, they can be had for a bargain (retail is $299.99 USD).

In regards to the 2013 line, I am not skeptical on how good of a shoe it will be.  They do, however, remind me of a track shoe (the running kind) in their construction, and I am not sure how that will play out durability and comfort-wise for cyclists.  I also do not understand why Fizik took one of the most unique looking shoes on the market and turned them into rather ordinary looking ones.

Not that I would refuse a pair for evaluation, though.    

Monday, February 18, 2013

Riding Your First Century.

Don't be intimidated by this number.

One hundred miles.  Wow, that sure sounds like a long way on a bicycle, now doesn’t it?  Well, in reality, it is, and it is not.  The hardest thing about a Century is the mental aspect.  Sure, being physically fit is a large component of the event, however, it also depends how you prepare mentally to face “The Ton.”

Before you face that first Century, you should be competent enough on a bike to ride at least fifty miles (50).  Why fifty miles?  Well, that is not a magic number, really.  It is a basic benchmark to see if you are ready for the next level.  If you can safely do fifty miles (assuming your equipment, clothing and nutritional needs are in order), then you can do one hundred miles.  Yes, it is that simple. 

The key to turning fifty-miles into the Ton is not very difficult to realize, actually.  First, pace yourself.  The Century is a ride not a race.  By pacing yourself throughout the entire ride, the one hundred miles will tick by before you know it.  Second, you must fuel, fuel, and when in doubt, fuel again.  As on any ride, you should already be keeping a schedule of hydration and nutrition intake.  This is no different at a Century.  Those feed zones and rest stops are there to aid in your refueling so you can complete the ride without the dreaded Bonk.

On the equipment front, your bike and tires should be in good working order.  Quality cycling clothing will aid in the miles passing smoothly, and be mindful of the weather before you set out, thus you can prepare accordingly.  Remember to bring extra tubes, a multi-tool, and either a pump or a CO2 inflator with extra cartridges.  Eat a good breakfast, and bring along two water bottles (you will refill them along the way) and you favorite riding food.  And finally, bring along a good attitude and have fun.
   

Below is a recounting of my first century ride I did with a friend back in 2012.  It was the Ojai, California Century, and while I recommend you do a flatter one as your first, those whom are vertically prepared can feel free to tackle a ride with thousands of feet of vertical enjoyment (the Ojai had 5000 feet of climbing).

Here is a reprint of the article I wrote for another publication about the experience.

The names have been omitted to protect the guilty.


My Ojai Century Ride 2012

The Carpinteria rest stop.  Time to stretch and fuel up.

It is Sunday evening as I sit and write this, and truth be told, I am amazed I do not feel like I had just ridden my first Century.  Oh yeah, I am a bit sore, tired, and woke up with both hands in the claw position, however, overall, none too worse for wear, I proclaim.

Here’s how it unfolded.     

Arriving at the meet-point at O’Dark-Thirty, we loaded up and headed immediately for the closest Starbuck’s.  Hey, priorities!  We then hit the super-slab up to Highway (HWY) 101, and swung a right on HWY 33 into Ojai. 

The launch and completion point of the day’s festivities was MOB Bikeshop.  We checked in, got our bib numbers, route slips, raffle tickets, BBQ dinner tickets, ride food, drinks, and headed west in search of sore-legged bliss.

The Ojai Valley.

The scenery on the route was extremely awesome, taking riders west out of Ojai on HWY 150, past Lake Casitas, into Carpentaria, through beautiful Montecito, and then south to Pacific Coast Highway (PCH)/HWY 101, into Summerland, back into Carpentaria, through Rincon (you must actually merge onto the freeway here to follow the bike path), into Ventura, a left turn inland, onto HWY 126 into Santa Paula (where a beautiful old train station is located), then onto HWY 150, with a final drive down Dennison Grade and back into Ojai. 

In addition to the colorful scenery, elevations and beautiful real estate, were the host of riders, kits and bikes, with Team Break Wind (yes, their real name) a crowd favorite.  There were young and old participants alike, with speed and skill not only reserved for the youngsters.  The beauty of organized rides are the types of people they attract.  There were Roadies, Townies, Fat Tire People (mountain bikes), and one Beach Cruiser.  As for weather, it was cool overcast the whole ride until we hit Santa Paula, where the sun warmed us up a bit.  The final climb up HWY 150 was warm, but thankfully not too hot.

The author at a rest stop.  Remember to fuel up on a Century.

Back in town, and off our bikes, my butt was more grateful than my stomach, even after a wonderful BBQ Tri-Tip dinner at the finish.  As we chowed down our post-ride dinner, the music ceased, the light began to fade, and the break-down crew leaped into full force quickly dispatching the tables, chairs and Easy-Ups.  To paraphrase my friend: “I’ve closed down quite a few bars, but this is the first time I have ever closed down a Century Ride.”

My trusty Garmin Edge 500 logged exactly 100 miles, seven hours in the saddle, with 5,000 feet of climbing in total.  We kept each other going all the way with jokes and stories, even on the sustained 14% climbs we tackled.  In total, it was an incredible in-body experience, the weather was not too harsh upon us, and the organizers and volunteers were first-rate.

Part of the southern route takes you onto Highway 1 along the Pacific Ocean.

And now for the sucky part.  My buddy had two flats, one due to a previously undetected piece of glass, and the second one was a mystery puncture.  Thank the Good Lord that was it for flats in total.

As for me, my Ojai Century will forever be known as “The Day The Camera Died.”  While not quite so solemn as the hit song by Don McLean, it was sad to see an old friend that had accompanied me on so many rides fall out of my hand in a moment of stupidity, crash down on PCH, and puke its guts out.  Plastic bits, the camera body, the battery, and the data card all went in separate directions.  Note to self – Always use the camera strap.  The upside is I managed to retrieve the photos off the card, and the camera still actually works, however the LCD screen is broken, thus it would be difficult to compose shots, anymore. 

And, finally, just for good measure, I broke a spoke off my rear SRAM S40 wheel right at Mile 97, just after bombing down Highway 150 into the Ojai Valley.  Now, SRAM wheels had a habit of breaking spokes in previous generations, and they had assured consumers the issue had been rectified.  It appears to not be so (see my SRAM S40 review here).

One Century down and many, many more to go.

Friday, February 8, 2013

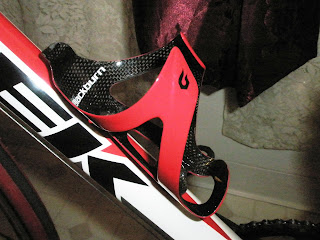
Long-Term Wrap-Up: Blackburn “Camber” Carbon Cages.


Probably more numerous than bicycle manufacturers themselves, bottle cages come in all shapes, materials and colors.  So, when looking into these little articles of cycling necessities, what should one look for, and does quality and design matter?

I’ll address the latter first.  Bottle cages are something most do not give a second or third thought to, yet are a vital piece of cycling equipment we all depend on to properly function, first time, and everytime.  Therefore, quality and design do indeed matter.  As to what one should seek in a bottle cage, well, that is pretty simple, really.  Pick a cage that will hold a standard shaped bottle safely and securely.  It should be easy to get a bottle in and out with no fuss, and it does not hurt if it looks good, too.   Colors can vary (just like bar tape), and materials can go from metal, to plastic, to my personal favorite, carbon fiber. 

Enter the Blackburn Camber carbon cages.  These beautiful works of composite art make up in performance, looks, and durability what they cost to purchase.  However, if you shop smart, they can be had for a whole lot less money.


Here are the specs:

  • 100% carbon fiber construction
  • 27 Grams
  • Flared mouth for faster bottle insertion
  • Unique reinforcing side ribs boost stiffness and bottle grip.
  • Reinforced lower cradle/ bottle stop area for added strength
  • Available in 7 Colors
  • Retail $49.99 USD
  • Lifetime warranty


I have been using the Camber cages for about 18 months now, and they have performed flawlessly.  Neither bumps, jumps, tip overs, nor knock overs have shaken my water bottles loose – Ever!  And remember, this is the purpose of a good cage in the first place – To hold your bottles safely and securely.  Plus, they look as good as the day I received them.

In case you may not have noticed, I am a sucker for all things red, so these cages just had to go on my bike when I first saw them.  Thanks to Dan at Pasadena Cyclery, Pasadena California, for hooking me up with them, and these cages look like they should perform, and last, a very long time.

Wednesday, February 6, 2013

We Get Schwag.


Yes, even this little, one-man operation in a cramped office can receive kind gifts from the Big Dogs.

In case you have been living under a rock, THE magazine to read is Southern California’s own Road Bike Action (RBA).  Either on-line, digitally, or via the always cool through the mailbox print version, every month RBA brings the goods on all-things-cycling, all without the BS.

So from the cramped, dark, damp cave of Cycling Dynamics, a giant, huge thanks to Editor Zap, hot-shoe Neil Shirley, the entire RBA staff for the excellent monthly, and for the kind support of this little operation.

Tuesday, February 5, 2013

Diligent Testing Still Occurs Here - The Fizik R3 Road Shoe.

                                     Full Carbon sole and simple, elegant design - What's not to like?

Even though this is an overworked, unpaid, one-man operation, I still get cool things to evaluate and give feedback about.  Well, the latest thing to be dropped onto my desk is a pair of Fizik R3 road shoes.

While the Fizik line has been totally revamped for 2013, with Nylon uppers and new, larger lasts, the Kangaroo leather and Microtex versions are nothing to pass up.  See, while an in-depth review will be forthcoming after I spend some time in them, the initial impressions are extremely positive.

Retail is $299.99 USD, comes in black, red or white, however, with the announcement of the 2013 redesign, they can be had for a whole lot cheaper.

And, I suggest you do give them a serious look.

Monday, February 4, 2013

Ritchey Road Logic Steel Frame

 Road Logic complete build.  Image courtesy Ritchey

For those of you not completely sold on carbon fiber as the do-all, end-all material for bicycle frames, here comes some good news from the minds at Ritchey Logic.  A heat treated, triple-butted, steel road frame guaranteed to put in the miles and put plenty of smiles on one’s face for years to come.

The Specs:

  • Sizes: 49, 51, 53, 55, 57, 59cm
  • Fork: Painted to match Ritchey Full Carbon Fork
  • Headset: Ritchey WCS Headset included
  • Bottom Bracket Drop: 70mm
  • Room for 700X28c tires
  • Retail: $1299.95 

                                       The frame weighs 3.9 pounds (55cm).  Image courtesy Ritchey 

Saturday, February 2, 2013

How To Ride The Road.


While bicycles and all their accoutrements are indeed tasty icing on the beautiful cake of life, let us not forget about the party itself – The ride.  I could write all day about bikes, parts, racing, apparel, and, of course, my opinions, but the soirĂ©e on the road is exactly what it is all about.  I have ridden from the mountains to the beaches, in the heat, in the cold, in the wet, and in the dry.  Along the way I have learned some important do’s-n-don’ts, which I am happy to share with all while you are out there “Partying.”

The city streets, bicycle trails (including river trails), rural roads, mountain roads, you name it, all are viable places to explore the world and your fitness.  I personally am in this gig for fitness and fun, so I vary my own activities to just about every venue I can roll wheels on (yes, even dirt trails).  Keep the fun and enjoyment of the ride going, and you will stave off the boredom that can set in from doing the same thing week-in and week-out. 

Where to ride? 

It depends on your goals and potential growth with cycling.  Is it for fun and fitness, to make new friends, test your limits, or go racing?  All have a different place to match their purpose, and all carry a certain amount of hazards to go along with the fun.  Riding for fitness can take you almost anywhere, from city streets, to the bike trails, to the beach, and yes, even the mountains (however, this can square you with one negative aspect of cycling in general - Motor Vehicles).  Making new friends and testing one’s limits can indeed go hand-in-hand, so tread lightly here.  If you prefer racing, then the only thing you must look out for are the riders that either “Win it, or Bin it.”  Remember, they usually do not crash their brains out alone.

A quick note about bike trails.  Walkers and runners seem to forget why these paths were created in the first place.  Much as freeways were created for fast moving traffic, bike trails were created to keep cyclists moving and away from cars and pedestrians.  The worst offenders are the insanely stupid “Opposite Direction” runners whom think it is our responsibility to avoid THEM and force cyclists to get out of THEIR way.  In short, Morons, they be. 

                                 Sometimes, it just feels like we have a bulls-eye on us.

As for the streets (where the bulk of riders ply their trade), here are some places (and times-of day) to avoid. 

School zones are an accident waiting to happen.  Parents always seem to be in a rush to not only get in and drop-off/fetch their kid but to get out, as well.  Avoid schools in the mornings and the late afternoons.  This is when it is the most dangerous, and, don’t forget the children that inadvertently dash into the street right in front of you, of course.   

Next, apartment complexes and mobile home parks can be lethal to your health.  There are way too much in-n-out activities at these locations, and it is here I have the most serious run-ins with vehicles.  Another similar place are shopping centers.  Again, way too much in-n-out traffic for your safety.

Intersections, especially those with designated Left Turn Lanes.  These are particularly dangerous because vehicles will not see you and make that left turn right in front of your path.  Why?  Well, if drivers fail to see other vehicles (including trucks and buses), then a cyclist has zero chance of being seen by some of these, well, complete Zero’s behind the wheel.  The times I have about shit by bib shorts were due to cars turning left into me.  And guess what?  In each case they kept going, proving my contention that they did not see me, did not care, or most likely, both.

So, is it all Doom & Gloom?

No, of course not.  Even with all of the vehicular dangers out there, think back to why we all started to ride in the first place – That Golden Rule of Cycling: FUN.  Remember why you started to ride if you begin to feel the fun slipping out of cycling (and yes, it will happen).  Nothing will get you off of the bike quicker than if it makes you apprehensive or becomes a chore. 

                                                            Party on!

So, above all, make sure you have a good time, obey all traffic laws, and remain as visible as you can at all times.  I have previously written articles about bright clothing and LED lighting even during the day to give ourselves as much of an edge as we can get.

Have a good time out there, and no quitting.  That is how clothing racks are born. 

Remember- Be safe out there.